Physical Address
304 North Cardinal St.
Dorchester Center, MA 02124
Physical Address
304 North Cardinal St.
Dorchester Center, MA 02124

If the situation is the same then don’t worry because here in this valuable article you will get a complete practical guide (with screenshots) on how to install WordPress on Hostinger Subdomain.
So, if you really want to do it, all you need to do is read this article and then take action by following these steps.
Then finally you will also be able to create a subdomain on Hostigner and trust me it’s as easy as 1, 2, 3!
Before we begin, let’s first take a brief look at the subdomain.
Subdomains are basically part of your main domain, so you can create them and create another website on your subdomain.
For example:
Main domain: bluepreneurs.com
Subdomain – forum.bluepreneurs.com
Now it is completely up to you what name you want to give your subdomain. It can be anything like a store, an app, or anything else.
Why purchase Hostinger hosting?

To create a subdomain, you must first login or register to your Hostinger hPanel.
So the first step you need to take is to login to your Hostigner hPanel.
As you already know that unlike other hosting providers, Hostinger has hPanel instead of cPanel, which is very easy to use and has a simple interface.
Once you’re logged into your hPanel, you’ll see your accommodation listed as Personal, Premium, Commercial, and more.
At the top of the screen, you can see a navigation menu that contains some items such as hosting, email, etc. emails, domains, etc.
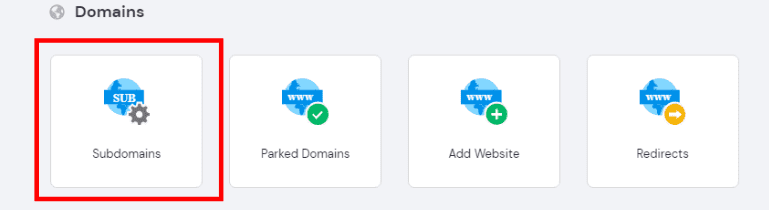
There you need to click on the “Hosting” section as you can see in the image below.

So, as soon as you click on the “Hosting” section, you’ll just be taken to this page where you’ll find a list of all the sites you’ve created.
Now all you need to do is select a domain name that you want to add a subdomain to.
You can simply do this by clicking the manage button as you can see in the image below.

So the next simple step is to just scroll down and there you will find a Subdomain box.
You only need to click on this subdomain box as you can see in the image below.
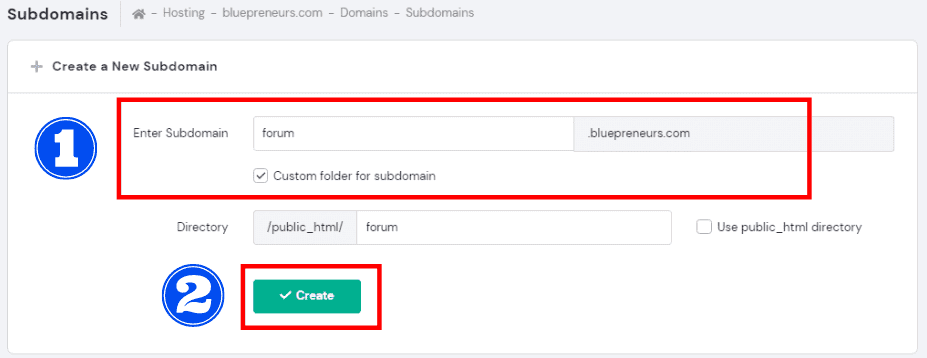
After doing all this, you will simply be taken to this page where you need to add your website’s subdomain.
To do this you first need to name your subdomain, in my case I named my subdomain forum so it would be forum.bluepreneurs.com.
After naming your subdomain, you just need to click on the “create” button as shown in the image below.
After adding a subdomain, 50% of the work of installing WordPress on a Hostinger subdomain is complete.
This is where our main work begins.
Now all you need to do is install WordPress on a Hostinger subdomain.
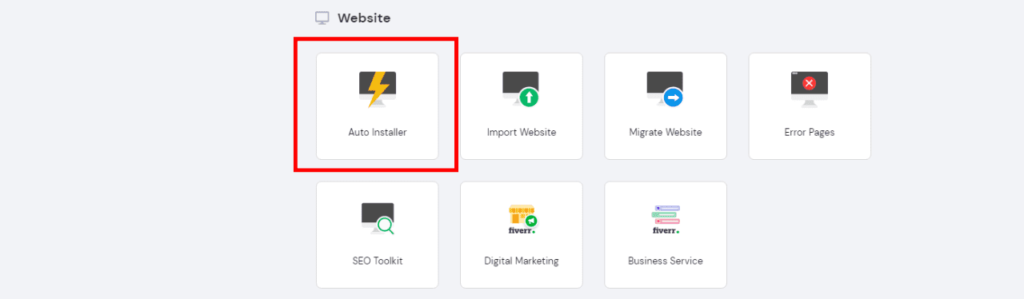
To install WordPress, you need to go back after adding the subdomain and there you will see an automatic installation section.
So you just need to click on this section as you can see in the image below.
Once you’ve followed the Auto-Installer section, you’ll be taken to this page where you’ll need to select a platform for your subdomain.
I am sure you will choose WordPress to create a website on your subdomain.
So for this you need to choose WordPress as you can see in the image below.

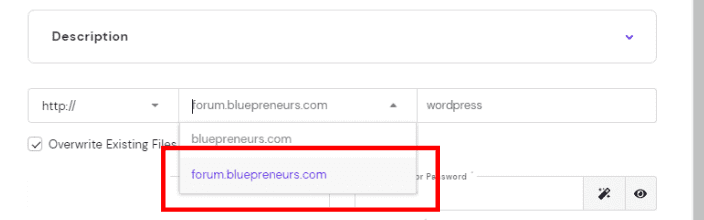
After choosing WordPress, you also need to choose which domain or subdomain you want to install it on.
Now you will be able to see a drop down menu and then you will see your subdomain that you just created.
You just need to select that subdomain as you can see in the image below. Like in my case I have to go with forum.bluepreneurs.com.
Before you install WordPress on a subdomain, Hostinger will ask you to add your WordPress login details, so you can simply log in to your dashboard by entering these details.
Here you need to set your username, password, name of your WordPress site, languages, etc.
So first you need to fill all these details as you can see in the image below.
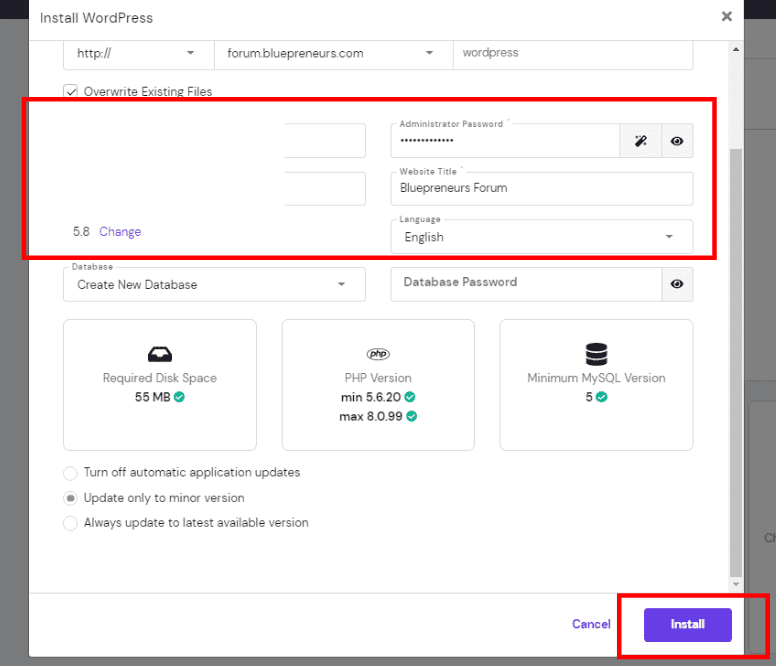
Finally, you are now one step away from installing WordPress on a Hostinger subdomain.
After doing everything correctly, you just need to click the Install button and it will install WordPress.
After successfully completing all the steps, you will be able to see your subdomain in the list of installed applications.
Now you are ready to move to your WordPress dashboard.
You can follow that link to migrate your WordPress as you can see in the image below.

Read- How to Start Your Own Affiliate Marketing Business [Top 5 Steps]
Well, most of the readers have left the article here, but let me tell you, if you are also planning to do the same, then you shouldn’t.
If you are a website owner then you can use Cloudflare, if not then I recommend you to use Cloudflare as it will make your website faster and more secure.
If you use Cloudflare, you may not be able to access your WordPress dashboard, and this is due to a DNS zone managed by Cloudflare and not your hosting provider.
To access your WordPress, you need to follow several steps.
Here are some detailed steps you need to follow to access your WP Dashboard for Cloudflare.
First of all, you need to log in to your Cloudflare account and there you will find a list of sites that you have added to Cloudflare.
So in my case I will follow Bluepreneurs.com as you can see in the picture below.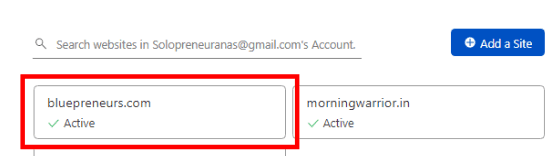
As soon as you open your website, you will simply be taken to this page where you can see your website analytics.
After that, you just have to look at the top, there you will find DNS option, then you have to click on that option.

After following that DNS option, you will end up on this page, where our work begins.
You only need to add registration first to access WP Dashboard.
So for that click on Add Post.
Then you need to set the field option as follows:
I know that many of you will get stuck here in this area, but don’t worry, relax, it’s very simple with me.
So in this case you only need to contact your hosting provider which is Hostinger. Ask them to tell you the IPv4 address so you can post it here.
You can also tell them the whole situation and they will surely help you.
Once you get your IPv4 address, just paste it in this section.
Now let’s continue our field.
As you can see in the image, given below.

After successfully completing all these steps, all you need to do is relax.
You need to wait a while for the DNS to update.
Sometimes the update takes 15-20 minutes, but in some cases the DNS update can take up to 72 hours.
You can double check by trying to access your WordPress site or subdomain.
If you also want to create your own WordPress website now by following a few easy steps, I recommend you follow the button below.
I hope you can login to your WP dashboard. Now, before you start your WP site, you need to do a lot of configuration on your dashboard.
So here in this article I will share some basic settings that you need to do on your WP site before you get started with it.
The site is more beautiful with a theme. Therefore, you should choose the best theme and add it to your dashboard.
There are two types of WP themes, Premium Themes and Free Themes. Now it depends on your budget whether you want to go premium or free.
I will always recommend you to use a premium theme as it will load your site faster as they are lightweight and it will help you rank your site.
I am using Affiliate Booster Premium theme which is really very light.

You will find several free themes in your WordPress dashboard when you visit Appearance>Theme>Add New.
If you want to add a custom theme, you can even do so by simply clicking the upload theme button at the top of that page.
You already know that plugins are the most important part of your WP site because they help your website work smarter and more.
Therefore, you should install some basic plugins so that you don’t have problems later.
There are many WP plugins, but you don’t need to install all of them because more plugins will slow down your WP site, so be careful.
Here are some WP plugins to install:
Apart from these plugins, there are many plugins available and you can install them according to your requirements.
This is also one of the most important settings you will need to make. Basically, here you need to install the caching plugin in your WP dashboard.
A cache plugin helps your website load fast and it also loads images on a particular page fast, so you should use it.
There are many caching plugins, but I use W3 Total Cache and my experience with it is amazing.
You can also use this powerful caching plugin to make your website load faster as this also helps your website ranking.
Since Google doesn’t rank those sites, it’s very slow.
After installing this plugin, you need some configuration to run it.
This is one of the most important settings you need to make before publishing your article on your website.
This will affect your site’s SEO, so be careful with it.
So, all you need to do is go to the permalink settings under Settings.
After entering this page you need to check the Post Name option and after doing that just click Save Changes as you can see in the picture below.

Once you’re done with this, you’re good to go. Now your blog post permalink or slug will appear in your blog post title and that’s good.
WordPress is an open source software and is one of the largest platforms for building any type of website, be it a blog, e-commerce, portfolio, etc.
There are also many alternatives to WordPress, but most people who want to build their website always choose WordPress for the following reasons:
WordPress is the best platform to build your website and it is also very simple and easy to use even for a complete beginner.
If you are also a beginner, then there is no need to fear the WordPress dashboard, it is as simple as 1,2,3.
The best thing about WordPress is that you can design and build your website without knowing how to program it.
This is also one of the important reasons why you should search.
There are many WP themes and plugins and you can use them according to your requirements. You can easily install any theme or plugin in WordPress.
Some WordPress alternatives don’t even have the ability to install plugins, and that’s why I’d recommend you go for WordPress.
If you want to rank your WP site or blog in Google, you need to optimize it by doing your SEO.
With WordPress, you can easily do SEO for your website and rank it on Google.
All you can do is install the SEO plugin and it will guide you to do SEO for your entire website.
If you choose WordPress to build your website, let me tell you that your website is very secure.
Along with the above features, WordPress also takes care of WordPress security and protects it from all hackers and spammers.
Creating a subdomain and building a website can be beneficial to you in many ways.
If your main website, which is your main domain, is already ranked in Google and has good Google authority, then let me tell you, you will benefit from it.
In this case, your subdomain website will be indexed quickly in Google and not only this, your main domain will also help your subdomain to rank in Google.
With your main domain, you can create several subdomains, and with those subdomains you can create multiple or micro-niche websites.
For example, with your main domain, you can create subdomains for your blog, store, app (for SAAS businesses), forum, etc.
The traffic of the subdomain site is counted as the traffic of the main domain.
For example, google.com is the main domain and drive.google.com is your subdomain. So if you try to find traffic on drive.google.com, you will get traffic from google.com.
If you have good traffic on your main site, which is your main domain, it means that your subdomain also has the same traffic.
Isn’t it great?
Want some practice getting your site on page 1 of Google?

On-Page SEO Guide
The simple answer to this question is Yes, you can host WordPress on a subdomain.
You can create multiple subdomains of your main domain and install WordPress on any of the subdomains you want.
And that subdomain site will be your new site with a new WP dashboard.
Yes, you can install WordPress on Hostinger.
Not only on Hostigner, you can install WordPress on any hosting provider.
With Hostinger, you will have access to hPanel instead of cPanel.
So you can also easily install WP in hPanel after adding your domain to your Hostinger hosting.
Yes, the subdomain is a completely separate website with the new WP Dashboard.
When you create a subdomain of your main domain, it means that you have created a new WP site on that subdomain.
Yes, of course, you won’t have to pay a single dollar to install or access WordPress after purchasing hosting from Hostinger.
Not only on Hostinger, but on all hosting providers, you don’t have to pay for WP installation.
Yes, if you have created several subdomains of your main domain, then you need to install WordPress separately on all those subdomains.
Since all subdomain sites are separate sites, therefore they have separate WordPress.
The simple answer to this question is yes.
Google sees each subdomain as a separate website.
If you have created several subdomains of your main domain, it means that you have created multiple sites on your main domain.
So if you are using basic, premium, business or any Hostinger plan. In all these plans, you can create up to 11 subdomains on Hostinger hosting.
So whether you are a beginner or not, I think this is enough for you.
The simple answer to this question is no.
It is imperative that you create a subdomain of your main domain. Usually, people create a subdomain to create another website similar to that niche or some other website related to it.
So it’s totally up to you if you want then you can create.
Well, in this article I can only share this value.
I hope you have understood how to install WordPress on Hostinger Subdomain and I am sure you will take action after reading this entire article.
After completing all these tasks, you can now work on your WordPress subdomain website.
Now it is up to you how to optimize your website and make it SEO friendly.
Share via: