Physical Address
304 North Cardinal St.
Dorchester Center, MA 02124
Physical Address
304 North Cardinal St.
Dorchester Center, MA 02124
I’m sure if you’re on this page, you’ll also want to know how to create a website from scratch without a website builder.
Don’t worry because here today in this valuable article I will explain in detail how you can create a website without using a website builder.
And this article is going to be very detailed and valuable, so don’t try to skip any part.
NOTE:
After reading this valuable article, you will know that you can create your own website without a website builder. So that you can also monetize your website from affiliate marketing, Google AdSense, sponsorship, etc.
Now from here you have to understand every step very carefully and start implementing after reading.
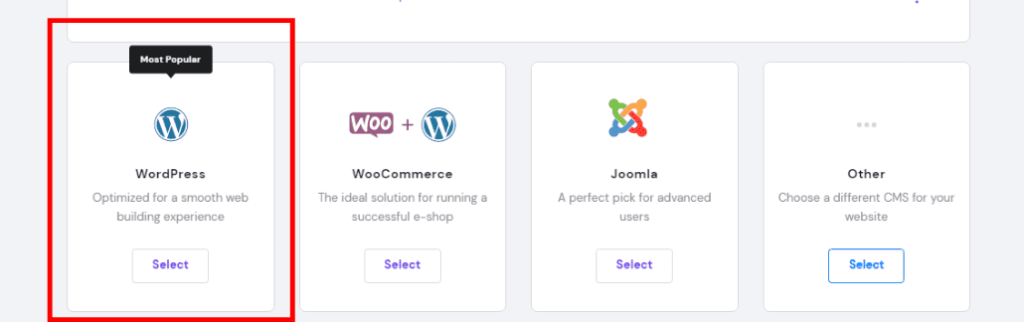
Basically a website can be made in 3 ways: Website Builder, Programming and WordPress.
I know you are a beginner and you may not know about programming and using website builders.
My favorite way to make a website is WordPress, all my websites are made with WordPress and they all look amazing.
To create a website, you need a domain name and hosting. I hope you are familiar with what domain name and hosting is.
First of all, you need to buy web hosting, and along with web hosting, you will also get a free domain name if you buy a premium plan of certain hosting.
A question arises. What is the best web hosting?
Whether you are a beginner or not, I would also recommend you to go with Hostinger Hosting as their services are amazing.
Why only Hostinger?
Here are the plans of Hostinger Shared Hosting:
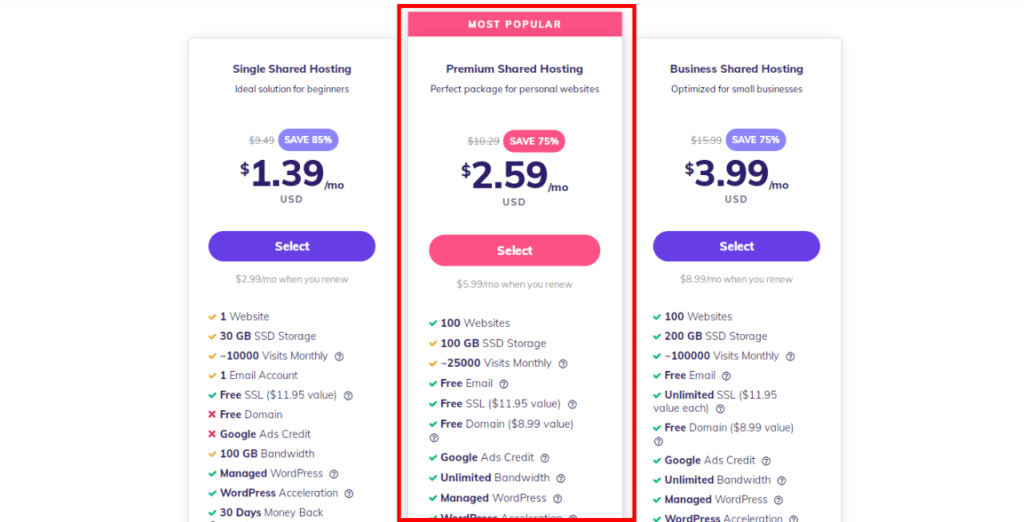
I have more than 1 year of experience with Hostinger and would rate 10/10 for their services like site speed, contact support, hPanel.
Below is the GT Metrix page speed data for my website (bluepreneurs.com) hosted on Hostinger.


I will recommend you to go for Hostinger hosting because you can start there from only $1.39/month and this is the lowest price you can get for the best hosting service provider.
After you purchase hosting, your domain name will be automatically added to your hosting dashboard if you’ve chosen the plan that gives you a free domain.
If you purchased your domain from another site, you can click here to learn how to connect your domain name to your hosting.
Now you just need to install WordPress on that domain name to create a WordPress site.
NOTE: The following process of Installing WordPress is in the case of Hostinger hPanel.
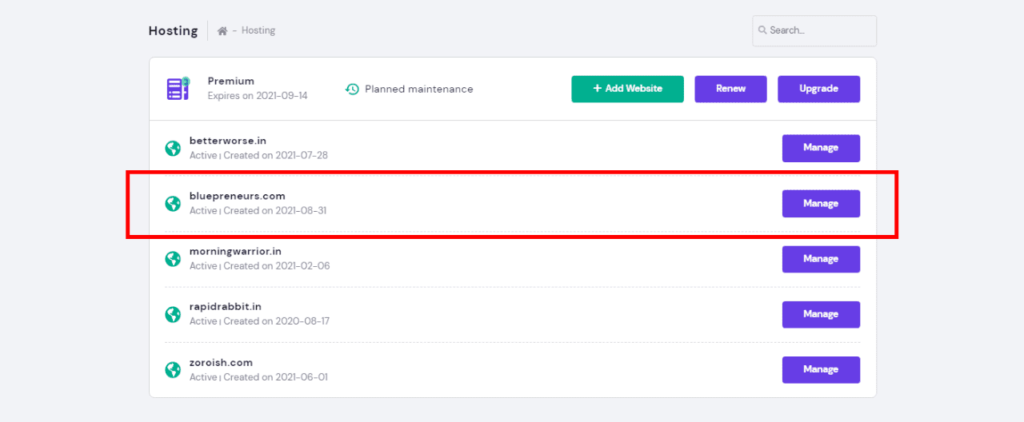
To install WordPress on your domain name, you first need to log in to your cPanel, in the case of Hostinger it’s hPanel.
Once you log into your hosting dashboard, you will see the domain name you added or received from the same host.
Now you just need to click on the “Manage” button.
After clicking on this admin button you will see many boxes then you just need to scroll down and there you will find Auto Installer box just click on that box.
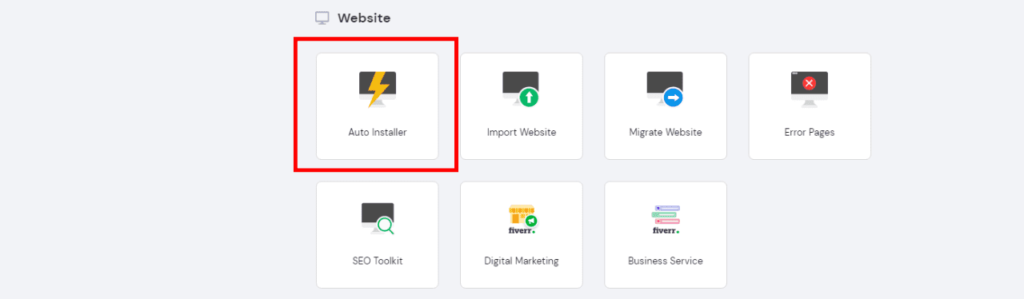
So when you are at the Auto Installer part, scroll down and now you just need to select WordPress (WP) to get it successfully installed on your domain name.
After selecting WP, it will ask you to add some details so that you can access your wp-admin on any computer or browser without logging into hPanel hosting.
You can see the image below to know all the details you need to add before installing the WP.
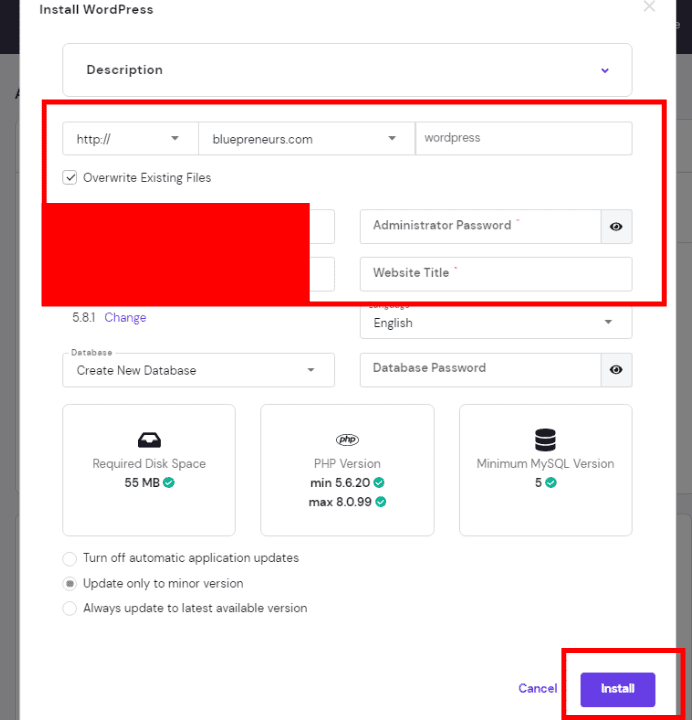
After filling all the details, the easy step to follow is to click the Install button, after this step WordPress will be installed on your domain name.
Now you are ready to go to your WP Admin Panel (WP Dashboard) so you can start working on your website to make it awesome.
Read more- How to install WordPress on Hostinger subdomain
After installing WP on your domain comes the most basic step you need to take to get started on your website.
To create a new WordPress site, you must first configure WordPress. there are some basic things and settings you need to do before proceeding.
The first step you need to take to install your WP is to install an attractive theme.
A good and beautiful theme attracts the user and in this way the user will stay on your website for a long time. Therefore, you need to install a beautiful theme on your WP dashboard.
Along with beauty, the size of the theme should also be considered, it should be lightweight so that it can load and upload quickly and it helps your website rank.
Premium themes are generally good, mobile friendly and lightweight. Therefore, I recommend purchasing a premium theme for your website.

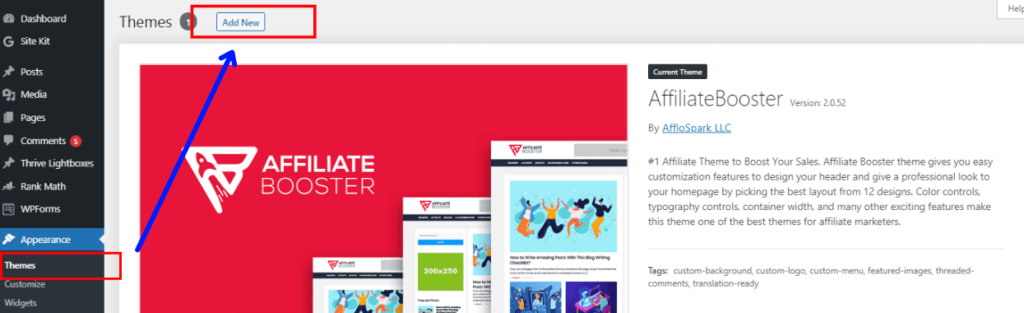
To install a theme in your WP Dashboard, you must first login to your WP Dashboard.
After logging in, you need to go to the Theme section, which is located in the Appearance section. There you will find the default theme provided by WP.
Now, to add a new topic, simply click the Add New option at the top of the page.
There you will see several free themes that you can install, but to add your own custom theme that you purchased from another site, just click the upload theme button at the top of the page.

Grab your Affiliate Booster offer
After installing the theme, the first step you need to take to create a website is to install a few basic plugins.
Plugins are basically software that make your website smarter and help us make our work easier. So you should use plugins too.
There are many WP plugins, but you don’t need to install all of them, you just need to install the plugins according to your needs.
Here are some basic plugins you should install:
but
Please don’t install too many plugins because more plugins will slow down your website and thus website speed will slow down and it will affect your website ranking in Google.
If you use shared web hosting, you should not install more than 20 plugins.
Try to install only the plugins you need on your site.
To add a new plugin to your WP Dashboard, all you need to do is go to the plugins section and click the Add New button as shown at the top of the page.
After that, you can search for the plugin you need to install, or if you want to upload a plugin file, just click the upload button as shown at the top of the page.

This part is my favorite because in this part we have to design our home page and that particular home page will be on our main domain.
Like if you come to bluepreneurs.com you will see a custom page that is not from my WP theme. This custom is created using the page builder.
Advantages of creating a custom home page:
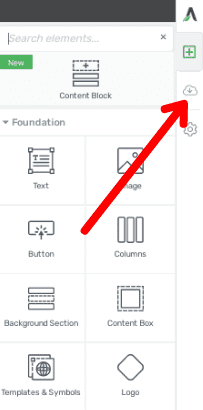
There are many page builders on the internet in the WP market, but I use Thrive Architect to create all my custom pages and it’s very easy.
Don’t think that designing a custom page with a page builder will be too difficult. Relax and be patient, it’s very easy to use.

First, you need to install Page Builder. So in this case I will recommend you to go for Thrive Architect or Elementor.
Basically, Thrive Architect and Elementor are paid plugins, but Elementor also has its free version that you can use. But you won’t be able to create a very good homepage with that free version.
Let’s say you bought the Thrive Architect page builder, then you need to create a page and name it Home. Then you need to set its width to Full Width (see the options on the right).
Also, make sure you set Sidebars to No Sidebars. This will remove the sidebars from your home because we will make that page a full width page.
After that you need to open that homepage with Thrive Architect and now you need to design your homepage according to your style.
Now you can see a small import icon on the top right, just click on that icon to import your pe home page template.
Now when you click on this you will see many templates, now you only need to select the template you like the most and just click select Template, this will import all the template to your home page.
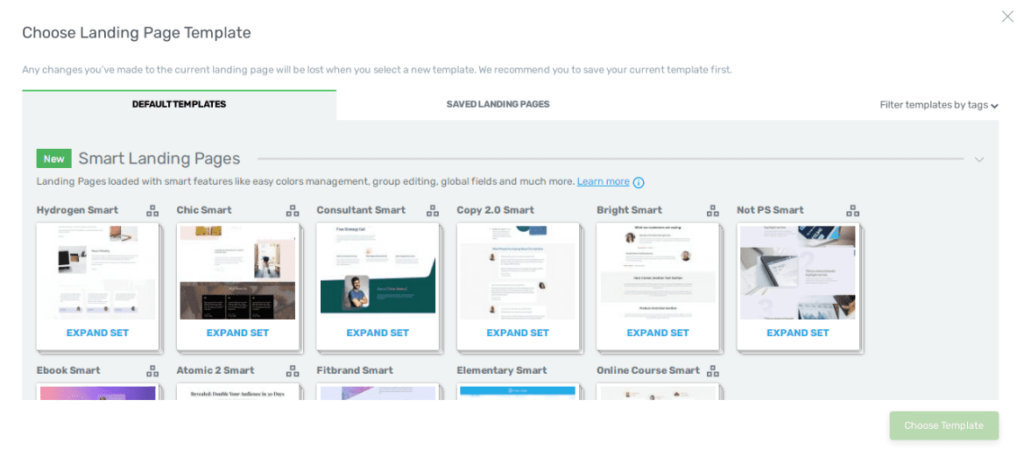
After the template is successfully imported, you just need to start customizing it. Now it’s completely up to you how to customize your page and make it more beautiful.
Thrive has many customization options. You can add any element to your page such as lead generation, image, video, custom HTML, list of posts and more.
After creating and designing a custom homepage, you now need to create a blog page so that all of your blog posts can appear on that page.
To do this, just click on “Add New” in the “Pages” section, then you need to name it “Blog” and then just publish.
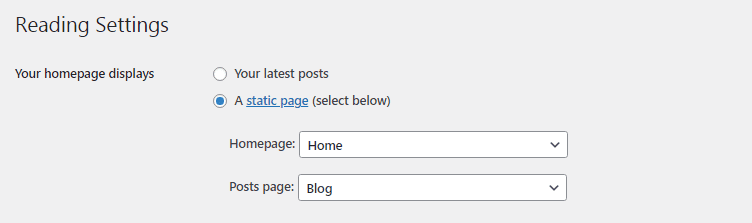
After publishing this page, go to the Reading section located in Settings.
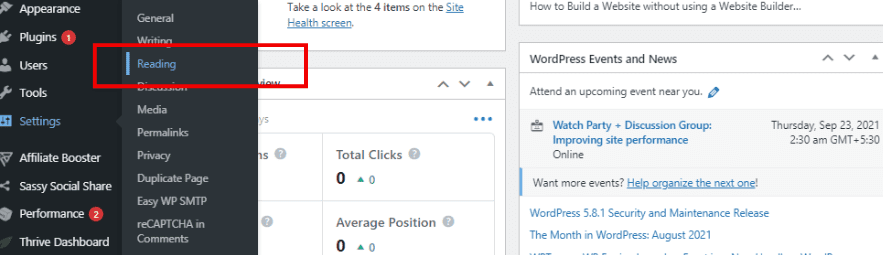
So when you are on this page, you just need to set your home page to ‘Home’ and your post page to ‘Blog’ and then click ‘Save Changes’.
So, when you are done with all these things, this means that you have successfully created your custom home page and blog post page.
After that you can simply add pages like Home, Blog, About Menu under Appearance section.
To create a website without a website builder, you first need to create a custom homepage, and then customize all the pages on the website where your WP theme is active. But this is very easy and you can do it quickly.
All you need to do is go to the Personalization section located in the Appearance section.
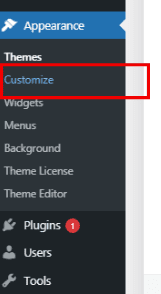
Once you do this, a new page will open with a left panel containing customization options and you can see the changes you’ve made side-by-side.
Basically, the customization options are different for everyone, so if you’re using Affiliate Booster, you’ll see the same options below.
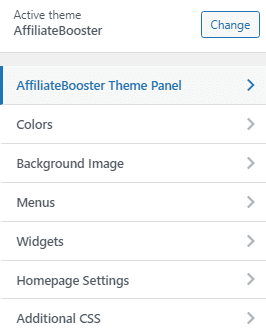
So, you only need to visit each section and customize your site according to your style and choice.
Now, I’m pretty sure you might be familiar with the Menu option. As you can see at the top of bluepreneurs.com there is a navigation menu which contains some navigation to pages or categories like blog, about etc.
Adding this section to your WP website is a must as it helps the visitor understand your website and also helps your website rank higher on Google.
To create a new menu, simply go to the menu section located in the Appearance section.
So, once you are on this page, you need to click on the “Create Menu” option, then a new menu will be created for your site, which you can name whatever you want.

After you create a new menu, you need to add items to that menu, such as categories, pages, custom links, etc., before you can display those items.
After adding the items you need to scroll down and then you need to select the display location which means where you want to display this particular menu and then just click the save button.
Widgets are some parts that are additionally added somewhere on your page.
For example, widgets are the sidebar, banners below the header or above the footer, etc.
With the help of widgets, you can add elements inside the footer of your website and make it more attractive.
NOTE: Widget customization options are different for different themes.
To add widgets or manage your sidebar and footer, all you need to do is go to the widgets section in the Appearance section.
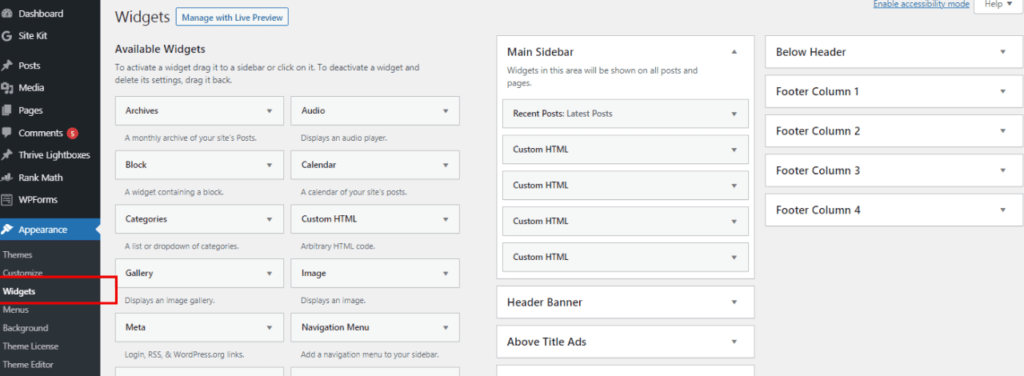
Once you enter the widgets section, you can see various elements that you can add to your sidebar, header footer, and more.
There are several WordPress themes, but not all of them are SEO friendly or lightweight.
Therefore, I recommend choosing a lightweight and SEO-friendly theme.
I am using Affiliate Booster Premium theme on my website (bluepreneurs.com) and I am experiencing a good website and WP site and not only this, it is SEO optimized.
I use this one and would recommend it to you too as it is very cheap.
Now this is a question that gets asked several times. Not only beginners, many people also google why they need to create a website. In short, they want a website.
After this period of COVID-19, the need for a website has increased. There are many people who are not able to earn offline and that is why they are switching to online industry.
To make money online you need a website. It doesn’t matter if you are blogging, affiliate marketing, freelancing or e-commerce.
Therefore, in today’s world, if you want to make money online, you must have your own website.
First, if you have created your website, let me congratulate you.
Now, many of you may be thinking that after buying hosting, installing WP and configuring all WP settings, what should we do?
Don’t worry, in this article I will also share with you some professional tips that you will get from your website after it is created.
To make money from any kind of website, you first need traffic to it. As I’ve said many times, if Content is King, then Traffic is the Theme.
So, to drive traffic to your website, you first need to add content related to your niche. Your website niche can be travel, digital marketing, health etc.
There are several ways to drive traffic to your website.
SEO – Now after creating a website you need to put SEO optimized content on it so that your website content will rank in Google and this way you will get traffic.
To get traffic from Google through SEO, you need to do SEO on your website’s blog post page.

On-Page SEO Ebook
Quora – Quora is a goldmine for website owners to generate free and targeted traffic to their website. You only need to answer the question that relates to the content of your niche.
So you will get very good amount of traffic for your website.
Social Media – You should never skip this method when it comes to getting free links to your website. With this method, you just need to share your content on various social media platforms.
Paid Advertising – This is a paid method. But by using this method you can not only get traffic but also easily generate big income from your website.
With this method, you need to run paid campaigns so that you can easily get targeted traffic to your website.
 To make money from your website, you need to monetize your website from any source of income.
Nowadays, there are many ways through which you can easily monetize your website and earn income from it.
Some of the best ways to monetize your website:
This is my favorite source to monetize a website and make money online from it.
So, you just have to join some affiliate marketing programs or networks first, after that you have to promote those programs through articles or pages on your website.
So if someone buys a service or product from the affiliate links on your website, you will get a commission.
Now this is the main source of income for my YouTube channel.
In this source you must first have a lot of traffic to your website and based on this brand in your content niche, they will contact you to list links or articles for your services or products and get paid for it.
You can also contact brands relevant to your content for sponsorship deals.
I am sure you are aware of this way of learning through our website.
This way, you just need to put more content on your site and then generate traffic. then after that you can apply for Google AdSense so that AdSense can place ads on your site.
Now, if you have any skill in any category, then let me tell you that the website monetization method is for you.
This way, you just have to sell your course that you started on another platform like Udemy, Skillshare or Linkedin Learning.
You can sell it for whatever price you want and you can make money online with your website.
Now many people ask this question, and most of them do not even get the right answer to their question.
But don’t worry, I’ll explain the reasons why you should create a website without using a website builder.
Here are some advantages:
If you choose a website builder to build your website, you can design a good website, but there will be fewer customization options. You will not be able to add your own style or design.
But with a website built on WordPress, you’ll get plenty of customization options. You can design anything to suit your style.
And this is one of the biggest reasons to choose WordPress to build your website.
This is the biggest problem with websites created by web builders. I have seen many sites that are built by a web builder and all of those sites have speed issues.
So here, in this case, WordPress comes into play. If you are going to create a WordPress website, then you will not face such a problem, because your WordPress is installed on your web hosting, which offers good speed.
Well, this is also a remarkable reason. If you are creating your website with the help of a website builder, the management can be complicated for you.
But with WordPress websites, you can easily manage your website with easy navigation.
Well, if you ask me, I will give you a simple answer to this question, which is yes.
Creating a website without using a website builder is a much better option. This will give you more options that you can use to improve your site.
Yes, if you are a beginner, you can also create your own website by following a few simple steps.
I created my first website when I was 17 years old and it gives me good feedback. Then you can also follow the steps given in this article.
The answer to this question is yes. Building a website without a builder is a much better option. You can easily make it according to your style.
To make money online blogging, affiliate marketing, freelancing or e-commerce, you need to have a website.
Because it helps build brand value and better explain our work.
Actually, there is no exact answer to this question. You can create a website of any type or niche.
It could be a travel, fashion, vlog, health, sports, digital marketing website, etc. But first you need to see what you are good at.
Based on this, you should start creating your website.
Now listen to me carefully, whether you are a beginner or not, I will also recommend you to go for Hostinger Hosting.
I have more than 1 year experience with Hostinger and based on this experience I recommend this hosting.
Now you are smart enough to find out how it is suggested.
After explaining all these topics in detail, I think there is nothing left in this topic.
I am sure this valuable article has solved your doubt or query about how to create website without website builder.
So, you only need to understand all these steps properly and then start implementing them so that you too can create your own WordPress website without a website builder.
And after making a WordPress website, you can also earn money online just sitting at home.