Physical Address
304 North Cardinal St.
Dorchester Center, MA 02124
Physical Address
304 North Cardinal St.
Dorchester Center, MA 02124

If you want to start making money through affiliate marketing, blogging, email marketing, freelancing, or anything else, you need a website in every industry.
Many people think that making a website is a very skilled or technical job.
but wait
Let me say that building a website today does not require any skills or programming language.
All you need is a domain and hosting and nothing else.
With the help of WordPress, you can create any type of website, and that’s what we’re going to learn in this more detailed article.
Here I will give you the ultimate guide on how to create a website with Hostinger hosting and believe me, it will be very interesting, easy and simple.
After reading this article or following the steps mentioned in this article, you too will be able to create your own website.
So let’s get into it.
Why Read this article?
Below you can see GTMetrix’s speed of billmaal.com, which is (currently) proudly hosted on Hostinger.


Now it’s time to start building a website with Hostinger.
Here you will get all the practical steps, so all you have to do is follow these steps to build your own.
Like other hosting, Hostinger also provides you with many types of hosting such as shared hosting, WordPress, hosting, cloud hosting and more.
You will get many bets and affordable plans in every hosting.
So, if you are a beginner and have less budget, all you can do is just opt for shared hosting as they are specially designed for bloggers and small and medium website owners.
These are the Hostinger Shared Hosting plans.
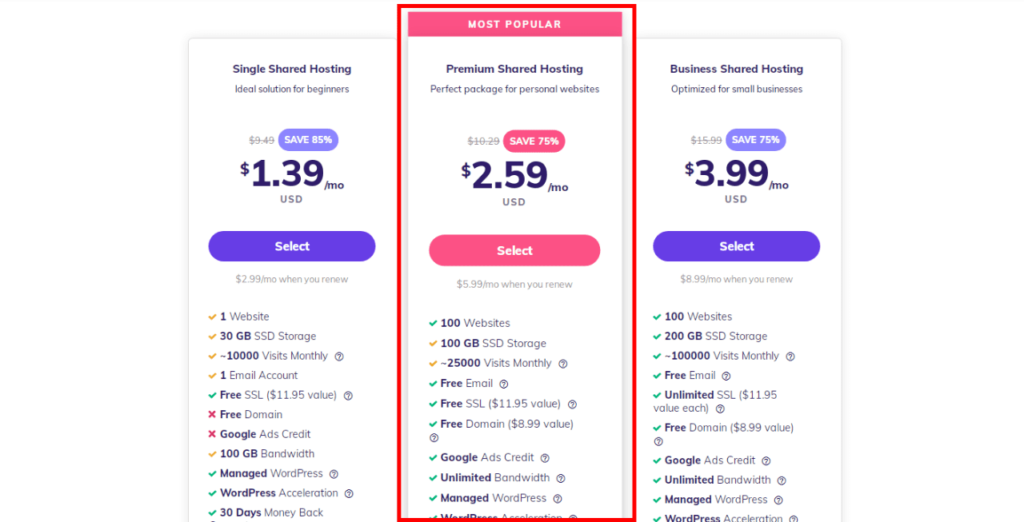 Now all you have to do is choose the best plan for your needs and budget.
NOTE: You can purchase any of the web hosting plans as it is up to you, but I would like to recommend the Premium plan of shared hosting.
As in this, you can host up to 100 websites and along with this, you will get many benefits.
Once you’ve chosen your Hostinger web hosting plan, it’s time to choose a period and make a payment.
The best part about Hostinger is that you can also buy hosting here for 1 month.
But let me say that during this period you are not in profit, but rather in loss.
You should choose a plan of at least 12 months so that you can save some money and also get some discount.
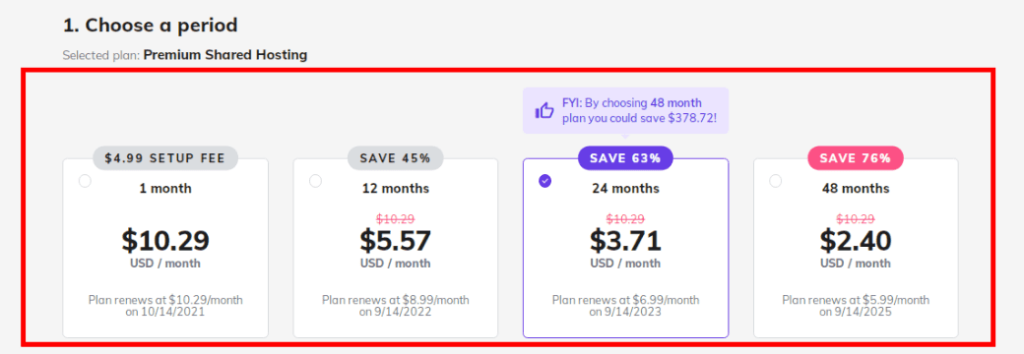 If you have enough budget, you can also choose the 24 or 36 month plan.
As you can see on their website, the 24-month period is recommended because you get a big discount during that period.
But ultimately it’s up to you.
Now this is the most important step to focus on.
If you purchased web hosting from Hostinger, you get a free domain name.
but
If you have already purchased a domain name for any other external website such as GoDaddy, BigRock, then you need to add your domain.
Let me say that in both cases, you need to install WordPress on the domain.
To do this, first of all, you should follow the following steps: (In case you purchased a domain for an external website)
So, once you are on the hosting page, you will be able to see the domain name that you recently added.
Then you just need to click the manage button for that domain that you just added.
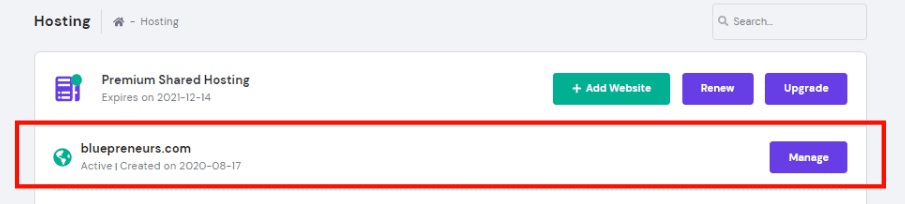 Then you will be directed to the page and then you just need to scroll down and then you will be able to see the Auto Installer option.
Now all you have to do is click on the “Auto Installer” option.
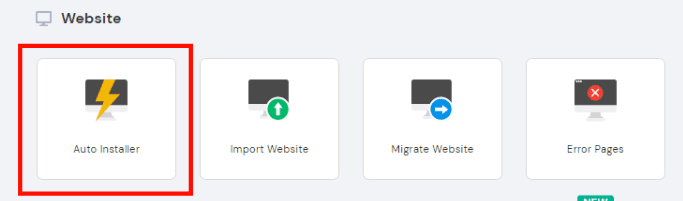 Once you click on that option, you will now find a section where it will ask you to select software to install on your domain.
You should choose WordPress because WordPress is the biggest website building software.
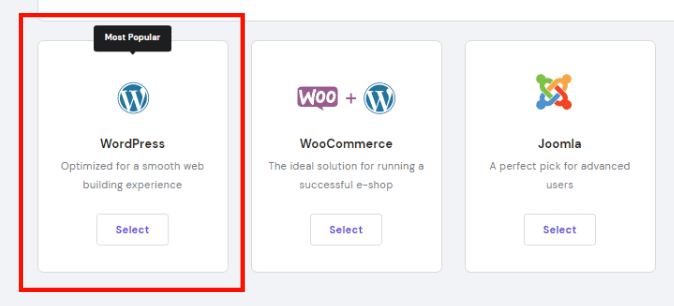 Read: Why choose WordPress to build your website?
Once you choose WordPress, all you have to do is install WordPress on it.
but wait
You need to select the domain you want to host WP on (if you have multiple sites on your hosting account).
Before installing WordPress, you need to provide them with some information such as your email, username, password, as well as the website name.
After providing this to them, you need to click the install button to install WP on your domain.
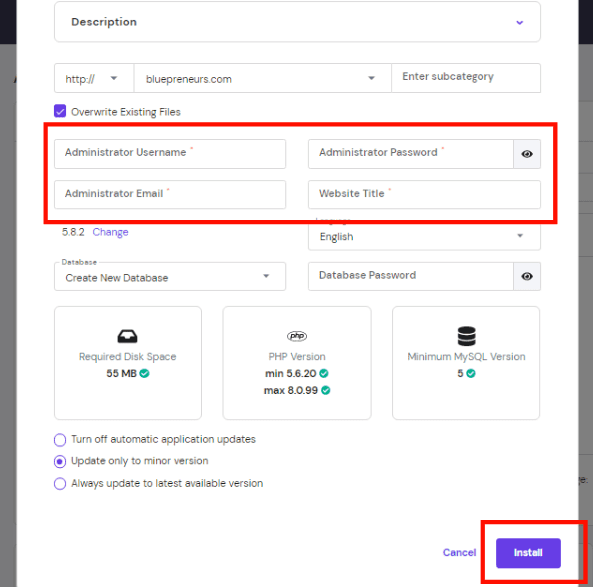 This username and password will be your WordPress login credentials, so you should remember them.
Now, after installing WP, you also need to install SSL on your domain so you can include https in your URL.
To do this, you can go to the SSL section (in the top bar). There you need to install SSL on your domain name.
Now that you’ve installed WordPress on it, you need to access it by going to the URL: www.yourdomain.com/wp-admin.
Once you’re logged in, you’ll get there, now there are a few basic WP settings you need to make before continuing.
For example, you need to change the permalink format so that the URL of your pages and posts looks good and is SEO friendly.
For this you need to go to the Permalinks settings section where you will be able to see many formats, you need to select the post name format.
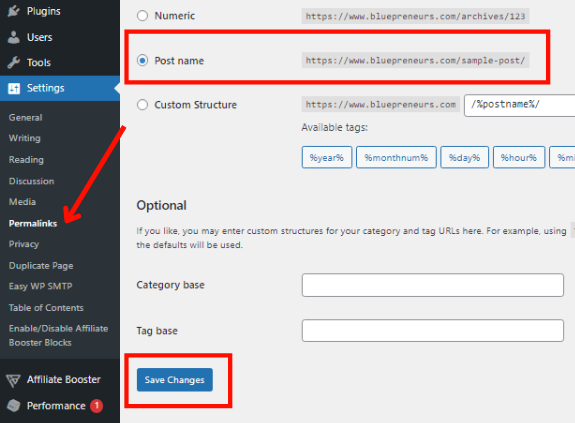 After that, you should click the “Save changes” button.
Now after this you can even set the permalink as you want while adding or creating a page or post.
An attractive theme or design will make your website look good and this is the reason why visitors will stay on your website for a long time.
Therefore, you should install an attractive theme on your website.
But wait,
As you all know there are different WP themes, some are free and some are paid.
Let me tell you, if you want your site to load fast and look great, then you need to get a paid theme.
Because some of the free themes are heavy and because of that your website will load slowly so the speed will be slow.
When buying a theme, you should also look for it to have more attractive designs and custom options, and along with that, it should also be SEO optimized.
Here let me recommend you the most popular, best and attractive WordPress theme which is Affiliate Booster.

attractive designs
Therefore, I will recommend you to buy this theme because it has very affordable plans.
When you’re ready to install a WP theme, you’ll also need to install some basic and useful WordPress plugins to make your site smarter and more responsive.
But you should not install unnecessary plugins as it will slow down your website. You should only install the plugins you need.
So, let me share with you some basic and useful plugins:
Apart from these, there are some other useful plugins, but as I said, you have to see your need and then install the plugin.
Now, if you want to create a website with Hostinger for blogging purpose, you need to add a blog page.
Now adding a blog page is very easy.
To create a blog page, follow these steps:
Now it’s time to customize the website header.
I’m sure you all know what a header is, it appears at the top of your website.
Contains your site’s logo and main navigation menu.
Everyone knows that the menu is the main part of your website.
You need to create a menu and add it to the navigation bar so that visitors can navigate your website.
Now let me show you how to create a menu in WP.
To do this, you need to go to the menu section, which is located under the appearance section.
Then at the top you will be able to see the ‘create new menu’ option, you have to click on it and then just create as per your need.
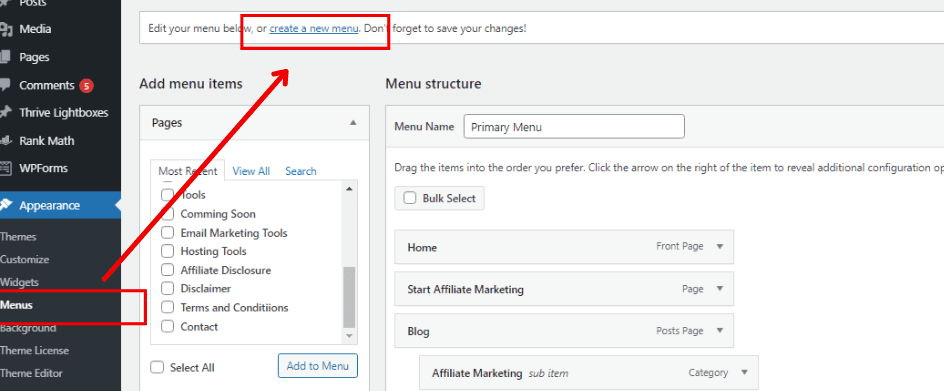 In that menu you can pages, categories, special links, etc.
You can even set that menu as the main menu so that it can appear in the top navigation of your site, which is the header.
To create a professional website, you need to have a personalized homepage that is well designed.
Let me inform you that you cannot create a custom homepage with WP theme, for that you need the help of a page builder.
Now here I will also show you how you can make a custom and professional homepage for your website to make it look great.
For this, first of all, you need to create a homepage, as always.
You also need to make some settings when creating the main page, such as removing the sidebar, setting the template to full width, hiding elements such as footer, header, etc.
Now after creating the home page you need to set it as home page and also blog page as post page.
For this setting, you need to go to Reading Settings, which is located in the Settings section.
there you have to set main page as Home page and also Mail page as Blog.
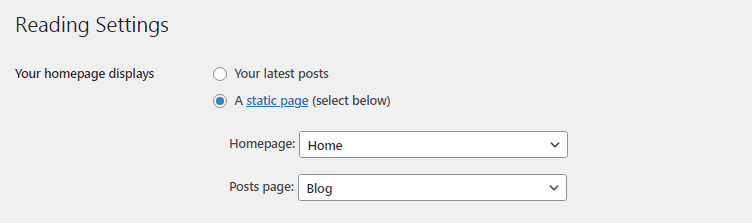 Once you’re done, you’re ready to create a professional, personalized homepage for your website.
Now I hope that half of your query on how to create a website with Hostinger has been solved and you are moving on to creating a custom homepage.
Now the first step you need to do is to install the page builder.
There are many page builders out there, but let me recommend you the best and easiest to use, which is Thrive Architect.
Thrive Architect is the best and easiest to use page builder for creating professional pages. I have been using it for more than 1.5 years and I am satisfied with it.

So, I recommend you to get this page builder to create your website with hosting.
Now after installing this Thrive Architect plugin you need to upload it to plugins section.
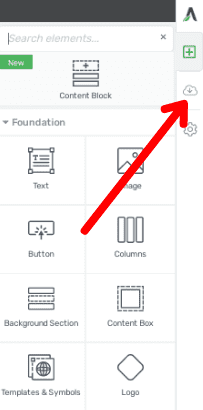
After installing it, you need to open the homepage with prosper architect so that you can start building your website’s homepage.
Now, as soon as you open this, you will see a blank page with some options on the right side.
All you have to do is click the ‘import’ option (here is the second option) to import the new template to your page.
 If you want to design the entire page yourself, you can even do it without importing any templates.
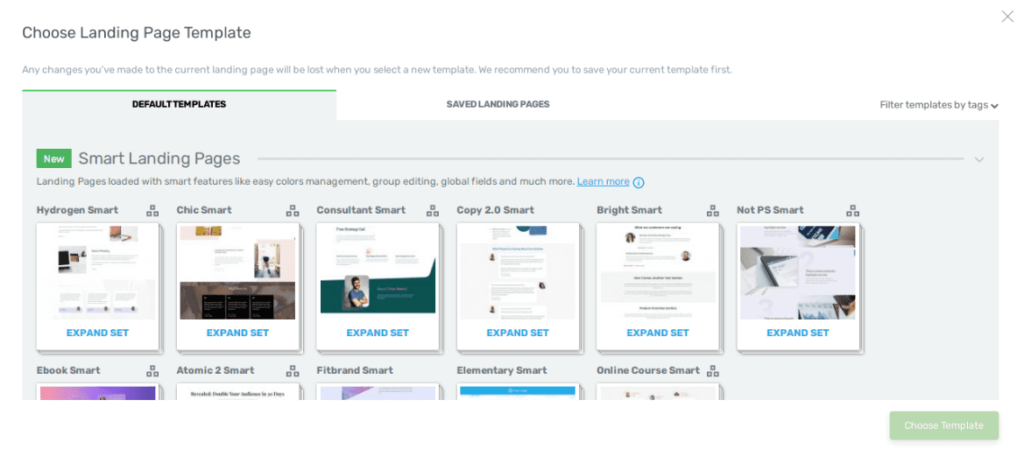
After clicking on the import option, you will be able to see many best, responsive and attractive templates that you can import.
Some templates are free and will be paid, so if you want the paid one, you have to buy it.
Therefore, you should choose the template that you like the most and that fits your website’s niche.
Once selected, all you have to do is select it, then click on the “Choose Template” button, and then simply import the home page from it.
 So, once you’re done installing the homepage template, you should start customizing it for yourself.
now listen
Customization is completely up to you. Everyone has a different option and can customize their page based on their choice and style.
After importing a template, you can customize each section, box, text, color, and more.
If you are going to select a section or item, on the left side you will get a panel where you can see many customization options.
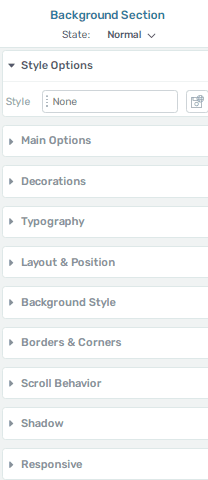 You can open any version and you can customize anything with this easy to use prospero architect page builder.
This is also one of the most important things to focus more on.
Your site must be mobile and tablet friendly, because if it isn’t, you might have trouble ranking with Google and never get approved byAdSense.
Now the question is how to make your website mobile friendly.
Let me tell you that you don’t need to do any extra work to do this, all you need is to adapt your website for both tablet and mobile.
If you’ve created a custom page with any page builder, you’ll need to make it mobile-friendly as well as tablet-friendly, thus making your website responsive.
You can see from the image below that this site is 100% mobile friendly.
mobile friendly website
You can also check whether your website is mobile friendly or not in any website like Technical SEO
So, I would like to recommend you some of the best tools to help you create a website with Hostinger.
These tools or services are very popular and used by many people, so you can easily trust them.
Apart from this, I also personally use these tools for all my websites, so I would like to recommend it.
So, once you’ve created your own WordPress website with Hostinger, you might be wondering what to do next.
Let me also give you a guide on what to do after building a website.
I have a guide for you, so if you follow it, you can also make money online with your website.
You need to start putting content on your website, but the content needs to have a place.
For example: If you are posting content in digital marketing, you should only post content related to that, not other areas such as health, fitness, real estate, etc.
Posting content in a niche will benefit you a lot as it will bring you traffic from search engine like Google and this traffic will convert into sales, buyers and more. from its branches.
Therefore, you should post only quality content in the niche.
When posting content on your website, don’t forget to optimize it for search engines.
Optimizing your content for search engines is known as on-page SEO (Search Engine Optimization).
If you do this, your blog posts or content will rank in Google and then you will get traffic from it.
Therefore, you can easily generate income from traffic to your website.
Once you publish content on your website, all you have to do is monetize your content.
Now the question is how to monetize your content so you can make money from it as well.
There are many ways to monetize your website content, such as affiliate marketing, Google AdSense, membership, sales training, e-commerce, and more.
You can choose any of the given ways to monetize your content.
If you choose Google AdSense, that’s fine, but you need to follow the AdSense rules and regulations to continue running ads on your site.
But otherwise, you don’t need to follow any AdSense rules and you can work on your site however you want.
But ultimately it’s up to you, you can choose any way to monetize your website.
The simple thing you need to do to host your website on Hostinger is to follow these steps:
1. Go to the Hostinger website
2. Choose your web hosting plan
3. Choose the web hosting period
4. Make the payment and get into Hostigner hPanel
Now that you’re on the Hostinger hPanel, you can easily host your website.
Yes, that’s too much.
Hostinger is one of the best and affordable web hosting service providers that provide you with many services and benefits.
Let me tell you that I have been using Hostinger for the past 1.5 years and have hosted several websites there.
And I am very satisfied with your services.
Hostinger is somewhat different from other web hosting providers.
It doesn’t have cPanel but it has hPanel which is actually easier than cPanel.
In hPanel, you can easily navigate and do everything yourself without the help of your support.
Yes, you can do this every month on Hostinger hosting and this is the best part that I like about this hosting service.
If you are on a low budget, you buy your web hosting on a monthly basis.
Whether you want to create an e-commerce website or something else, Hostinger is perfect for any type of website.
It provides you with 99.99% uptime and fast and secure website services.
Yes, WordPress installation on Hostinger is 100% free.
You only need to pay the hosting price and nothing else, with this you will get many things like domain, SSL, Litespeed technology and more for free.
If you want to edit your website in Hostigner, you must first log in to the Hostinger hPanel.
There you need to go to the administration section of your website, and then to the “control panel” section.
Then on the right side you will be able to see the option to “edit site”.
You can follow this option and then you will be taken to your WordPress dashboard and from there you can edit your site.
So this is the last section of the most comprehensive article I have ever shared with you on how to build a website with Hostinger.
Now I am pretty sure that all your doubts are cleared and you are now ready to set up your own WordPress website with Hostinger.
Let me share the title that we discussed in this article.
What we have discussed here